Liferay THEME Development
1.Setting up the Theme
Eclipse에서 Plugin project 생성 -> Plugin type을 Theme으로 설정
- Theme 분석
이클립스 프로젝트 생성 시 Theme parent로 _styled theme을 선택했고, 이것은 페이지의 모든 element에 default styling을 갖고 있다는 것을 의미한다. 모든 수정은 _diffs directory에서 이루어져야 한다. 그리고 이 수정은 parent directory로 전파된다. 그렇기 때문에 _diffs 폴더 안에 있는 directory들은 parent directory를 미러링하고 있어야한다. Structure가 매치되지 않는다면 수정한 것이 적용되지 않을 것이다. base file들은 변경되지 않은 상태에서 사용자는 무조건 _diffs directory에 파일을 추가하든지, 변경하든지 해야한다.
모든 CSS styling은 _diffs\/css\/의 custom.css 파일에다가 한다. 왜냐하면 이 custom.css 파일이 가장 마지막에 로딩되고, 이 파일의 style들은 parent base theme의 스타일을 오버라이드하기 때문이다.
docroot\/css, docroot\/images, docroot\/templates에서 몇몇 파일들을 _diffs directory로 복제함, guestbook-portlet.war를 설치함.
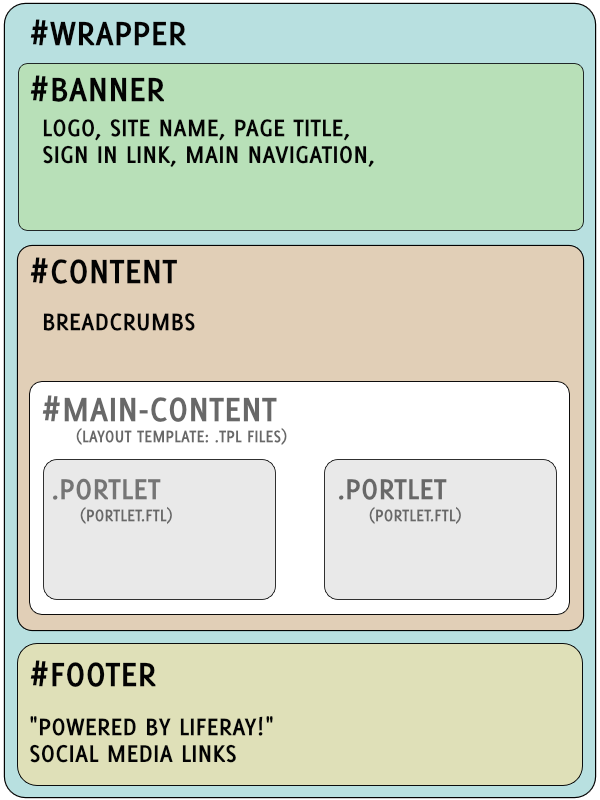
- Portal_normal.ftl 파일 분석
portal_normal.ftl 파일은 Liferay site의 모든 포틀릿들이 렌더링되는 템플릿이다.
HTML 구조는 Banner, Content, Footer의 세 메인 섹션으로 나뉜다. 이 세 섹션들은 wrapper div 로 묶여있다.
portal_normal.ftl, navigation.ftl 파일의 코드 몇 줄 수정 후 tomcat에 deploy.
Site Adminstration -> pages에서 public page의 theme을 Lunar Resort theme 선택 (현재 개발중인 theme)
Site 화면이 바뀐 것을 확인
2. Importing Resources for your THEME
다른 Resource를 임포트해서 theme을 구성하는 방법도 있다. Theme 정보를 담고 있는 archive.lar 파일을 만들 수도 있고, layout이나 directory structure의 content를 담고있는 sitemap.json 파일을 만들 수 있다. LAR 파일은 version dependent하기 때문에 sitemap.json을 써본다.
제공된 resources-importer 디렉토리의 구조
lunar-resort-theme/
docroot/WEB-INF/src/resources-importer/document_library/documents/- (documents and media files)
* `journal/`
  * `articles/`
    * \(web content articles\)

  * `structures/`
  * `templates/`
document나 media 파일들은 documents directory에 존재하고 structure, template은 journal directory에 존재한다. Web content article은 journal\/articles\/ 폴더에 있는데 XML 혹은 HTML로 구성된다. 이 Web content에 사용된 image 파일들은 documents directory를 레퍼런싱한다. src= "[$FILE=filename.filetype$]"
Carousel에 대해서는 (carousel이 뭔지는 아직 모르겠다..) web content는 journal\/articles\/carousel 폴더에 추가되고, structure는 \/structure 폴더에 추가되고, template은 \/templates\/carousel 폴더에 추가된다. carousel에 대한 구조는 다음과 같다.
journal/
articles/carousel/carousel.xml
(more web content articles)
structures/carousel.xml
templates/carousel/carousel.vm
- Sitemap.json 파일 만들고 해석하기
sitemap.json 파일은 web content, page, portlet의 layout을 정의한다.
{
        "layoutTemplateId": "1_column",
        "layouts": [
                {
                        "name": "Welcome",
                        "title": "Welcome",
                        "friendlyURL": "/home",
                        "columns": [
                                [
                                        "carousel.xml",
                                        "Welcome to the Lunar Resort.html",
                                        "Amenities.html",
                                        "2 column description.html"
                                ]
                        ]
                },
                {
                        "name": "About Us",
                        "title": "About Us",
                        "friendlyURL": "/about-us",
                        "columns": [
                                [
                                        "About Us Info.html"
                                ]
                        ]
                }
기본적인 예제는 위와 같다. 하나씩 해석하자면,
전체 페이지 템플릿을 1 column으로 유지하겠다. -> layoutTemplateID, 그러나 각 layouts의 페이지 별로 다르게 구성 가능
layouts에는 Welcome page와 About Us page의 구성이 나타나 있다.
Welcome page는 web content로 몇몇의 html 파일을 갖고 있다.
{
"name": "Activities",
"title": "Activities",
"friendlyURL": "/activities",
"columns":[
            [
                "Activities Info.html",
                "Activities Links.html"
            ]
],
"layouts":[
{
    "name": "Rover Racing",
    "title": "Rover Racing",
    "friendlyURL": "/rover-racing",
    "columns": [
        [
            "Rover Racing Article.html"
        ]
    ]
},
위의 예제는 Activities page가 Rover Racing page를 child page로 가지고 있는 형태를 나타냈다. (layouts를 nested)
{
    "name": "Collaboration",
    "title": "Collaboration",
    "friendlyURL": "/collaboration",
    "layoutTemplateId": "2_columns",
    "columns": [
        [
            {
            "portletId": "36"
            }
        ],
        [
            {
            "portletId": "115"
            }
        ]
    ]
}
위와 같이 portlet을 페이지에 구성하겠다고 하면 portlet-custom.xml에 나와있는 portletID를 참조할 수도 있다. 위와 같은 core portlet이 아니라 plugin 형태의 portlet이라면 "portletId": "guestbook_WAR_guestbookportlet" 처럼 portletName_WAR_projectName형태로도 구성이 가능하다. 이 아이디는 portlet.xml에 정의되어 있다.
- liferay-plugin-package.properties 구성하기
required-deployment-contexts=\
resources-importer-web
--> 주석 제거
resources-importer-developer-mode-enabled=true
resources-importer-target-class-name=com.liferay.portal.model.Group
resources-importer-target-value=Guest
--> 라인 추가 & redeploy
3. Styling Your Theme with CSS
wrapper는 theme element들을 가지고 있는 컨테이너다. theme의 포지셔닝과 스타일링에 사용된다.
#wrapper {
    background-color: $bkColor;
    margin: 0 auto;
    max-width: 1000px;
    padding:0;
    position:relative;
--> wrapper의 배경화면색으로 SASS $bkColor 변수를 사용
#banner, #content, 를 수정